Saturday, April 10, 2010

Maya Texturing Blues

Have you ever toiled badly for getting that texture placed properly onto your imported model in Maya? It happens a lot when you are using foreign Object files which you need to use for your animation. The main reason why this would happen is, that the model does not always import with its UV sets. In other words, you need to build a new UV set to work with.

Now, do the following:
  1. Open the Maya ( 2008, in my case) file you wish to work on.
  2. Make sure you have the "Polygons" menu selected and go to "Create UVs" from the menu at the top.
  3. Based on the kind of model you have, you should select the apt mapping technique. I am using a simple cube in this example and am leaving things to Maya by selecting "Automatic Mapping"

  4. Assign an appropriate material for you to work with by right clicking on the object and going to "Assign New Material" or "Assign Existing Material" based on your requirements.
  5. After doing so, as shown, select the texture to be used by going to the "Common Material Attributes" section and clicking on the Checkered Box besides "Color" as shown in the snapshot. I will use "Checker" in this example. (Hint: If you don't get the menu as seen in the image, keep hitting Ctrl+a till you do. Its a way to toggle views)

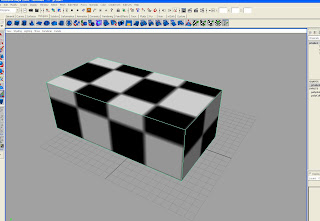
  6. In the perspective view of Maya, you should now get something similar to what is shown in the picture below. if you don't see a texture, hit the number 6 key on the keyboard to turn on the textured view.

  7. All this is quite trivial, but it becomes really hard when you have many UV sets in the scene. What do you do to toggle between UV sets? Typically, the default UV set would be called something like "map1". You need to BIND your texture to the UV set you have selected.
  8. One of the ways to do this is the use UV Linking. Right click on the object and select UV sets > UV Linking from the menu.
  9. Now in the "Relationship Editor" shown, select the apt UV set from the left hand side and the Texture you wish to use from the right hand side.

  10. Once done, you can be sure that the right texture will be mapped using the UV set you wish to use!
A view of how the UV editor would now look:


Another situation where people almost invariably lose their cool : OBJ file exports.

Maya does boast of a cool OBJ file export plugin that ships with the product, but in most cases it DOES NOT preserve texture maps. So what do you do? A good way would be to use a product like Deep Exploration by Right Hemisphere. You can very easily open a Maya model in Deep Exploration and then export it as easily as an Wavefront OBJ (and the corresponding mtl file) - with the textures preserved!

Happy texturing!


Friday, April 09, 2010

Making memories of us

There is this thing about the rains. The lack of a productive atmosphere can make you probe deep into your thoughts and search for memories which are either hidden by effort or simply cast away, branded as unworthy or unimportant.

People – the ones that make our memories are so accessible these days. Keeping in touch is no more a pain, seeing someone far..far away is a piece of cake and knowing “What’s on your mind?” is usually just a few clicks away..

And yet, we long for that one offline meeting, that one long drive with pals, that long jamming night with only the chilly air and a thousand beautiful notes to fill the void of the darkness, the smile on your friend’s face when you gather for his surprise party which hardly ever is a surprise, the smell of the grass in the college garden when you walk towards your classes, the long talks which hardly mean much, a stop on a bridge overlooking a river which is probably the most beautiful in this world – made beautiful by the company of people you are with.

It is good to find such rainy day moments when you can savor what you had, and what you did – for we might just get pointers on building the way we’d like this day to be remembered, and probably be successful in making a few good memories of us friends. Again!